How to Use a Paper Cup Stiffness Tester: Complete Step-by-Step Operating Guide If you manufacture, export, or quality-inspect paper cups, there is one piece of lab equipment you cannot afford to operate incorrectly: the paper cup stiffness tester. A single procedural error can produce a false pass — shipping thousands of units that collapse in a customer's hand. A false fail, on the other hand, wastes production batches that were perfectly acceptable.
This guide is written for quality control technicians, lab supervisors, and production managers who need a clear, reproducible standard operating procedure for paper cup stiffness testing. You will learn the exact step-by-step process, the international standards that define compliant testing, calibration checkpoints, and the most common mistakes that sabotage results.
What Is a Paper Cup Stiffness Tester?
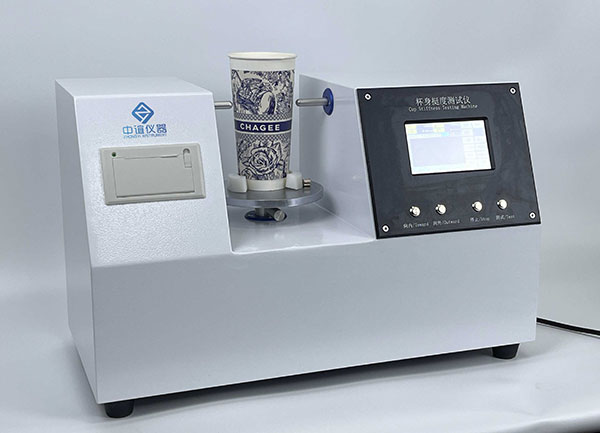
ZY-BSTD01 paper cup stiffness tester (also called a paper cup rigidity tester or cup sidewall strength tester) is a laboratory instrument that measures the deformation resistance of a paper cup's sidewall when subjected to lateral force. In plain terms: it tells you how firmly the cup holds its shape when someone grips it.
The device consists of a servo or stepper motor with ball screw drive, a force sensor with resolution ≥ 0.01 N, a test probe measuring 9.5 ± 0.5 mm in diameter, a movable specimen platform, and a digital display with data output (print/USB). The probe advances at 50 ± 2.5 mm/min toward the cup sidewall at one-third of the cup's height. When the cup wall deforms, the peak force is captured — that value is the cup stiffness, expressed in Newtons (N).
Why is cup stiffness testing so important for exports?
If you export paper cups to the European Union, United States, GCC countries, or Australia, your product faces scrutiny at multiple checkpoints:
Pre-shipment inspection (PSI): Third-party agencies like SGS, Bureau Veritas, and Intertek routinely include cup stiffness in their QC checklists.
Customs compliance: Non-compliant packaging can trigger import holds — cup stiffness is specifically listed under physical performance criteria in several national standards.
End-buyer rejection: QSR chains (McDonald's, Starbucks, KFC) maintain internal specifications that are often stricter than national standards. A cup that deforms during hot beverage service is an immediate complaint.
What are the testing standards for the stiffness of paper cups?
Standard
Scope
Key Requirement
GB/T 27590
Paper Cup — China National Standard
Stiffness ≥ 3.5 N; CV ≤ 10%
QB/T 2294-2006
Paper Cup — Light Industry Standard
Defines test principle: probe at 1/3 height, 50 mm/min
ISO 11093-9
Paper and Board — Testing of Cores
Relevant for larger paperboard containers
ASTM D790
Flexural Properties of Plastics
Referenced for composite cups
Detailed Steps for Testing the Rigidity of Paper Cups
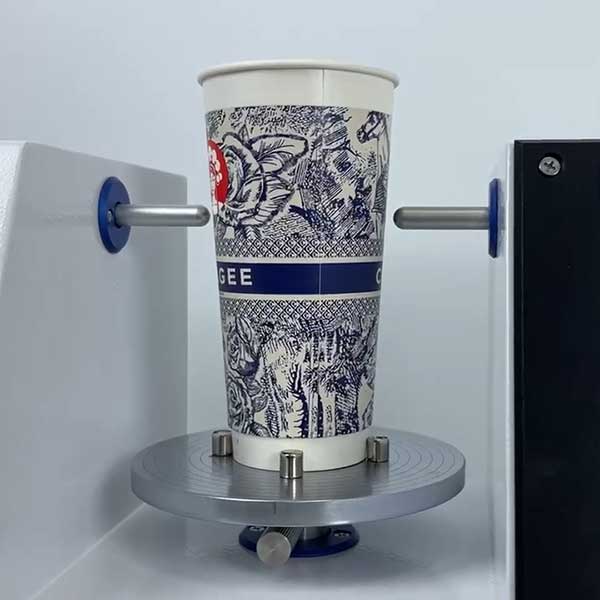
Step 1: Position the Specimen
Place the paper cup on the movable platform with the cup mouth facing toward the operator. The cup should sit naturally — do not press or rotate it into a forced position.
Step 2: Align the Test Probe
Adjust the platform height (or probe position, depending on your model) so that:
The probe tip just touches the cup sidewall perpendicularly
The vertical distance from the probe tip to the cup bottom equals one-third of the cup's total height (± 2 mm)
Why 1/3 height? Per QB/T 2294-2006, this is where the cup experiences maximum bending moment during normal handling. Testing at any other height produces non-comparable results.
Step 3: Set Test Parameters
On the digital control panel, confirm or set:
Parameter
Standard Value
Adjustable Range
Test speed
50 mm/min
1–200 mm/min (for R&D)
Probe diameter
9.5 mm
Fixed
Measurement range
0–20 N
Model-dependent
Data logging
Continuous
—
Step 4: Start the Test
Press the Start/Test button. The probe advances at constant speed toward the cup sidewall.
What happens during the test: The probe contacts the cup wall → force reading rises → when the cup wall deforms, force peaks and may briefly drop → the tester automatically captures the peak force → the probe retracts. The entire test takes approximately 3–5 seconds per cup.
Step 5: Record the Result
The display shows the peak force in Newtons (N). Record this value. If your model includes a built-in micro-printer, press Print for an immediate hard copy. If it supports USB export, transfer data to your QC spreadsheet.
Step 6: Repeat and Calculate
Test all 5+ samples. Calculate:
Average stiffness = sum of all readings ÷ number of samples
Standard deviation (SD)
Coefficient of variation (CV) = (SD ÷ average) × 100%
Operating a paper cup stiffness tester correctly is not complicated — but it is unforgiving of shortcuts. The difference between a valid result and a misleading one comes down to three details: probe positioning at exactly one-third cup height, proper sample conditioning, and consistent calibration discipline.
By following this step-by-step guide, your QC team can produce stiffness data that: is comparable with international standards (GB/T 27590, QB/T 2294, ISO); is defensible during third-party audits and buyer inspections; and actually reflects the real-world performance of your cups in the customer's hand.


 豫公网安备41032502000206号


